Easy Ways to Play a B Chord

Over the years no chord has caused more reaction from students than the B guitar chord (except possibly the infamous "F" chord). Many students have come to me for help, have already tried using the B major chord... and failed miserably.
More...
Generally they'd rather pretend it doesn't exist. Some brave souls are ready to give it another try… But you can see the anxiousness on their face. No one likes to feel like a failure.
And the sad fact is it really doesn't have to be that way. It's usually a lack of proper guidance, or they're not approaching the chord in a systematic way that is at the bottom of their bad experience.
If you haven't even tried the B chord yet you may be in luck. No bad habits, and no painful memories.
Do You Need the B Guitar Chord?
Fair question!
I remember in the first few years of playing guitar I avoided any song that had the B chord. After a while I had quite a collection of songs that I wanted to play but was avoiding.
You won't have to do that. Even if you're a brand-new beginner you will learn to play any song with a B chord.
Why the B Major Chord Has a Bad Rap
The B major guitar chord is one of a handful of commonly used chords that doesn't quite fit the "open chord" format. What I mean is that you can't play the B (a short name for B Major) with open strings like you can the C, D, G, A, and so on.
Are there many chords like that? You betcha...
But the difference is that many of those chords you can live without… Especially if you want to play folk style guitar. The B, along with a few other chords like F, Bb and B minor are necessary... or at least going to come up very often. That puts these chords in a different category.
The good news is that once you master even one form of the B chord you can apply the same principles to playing a bunch of other chords.
Three Forms of the B Guitar Chord
The way we're going to approach this is to use three different forms of the B chord. We'll start with the easiest form and progress to the ones that are usually considered more difficult to finger.
Here's the thing… All these forms are useful. None are "throw aways" that you won't use again after learning the more difficult form. You'll find that even if you can play the most difficult form there will always be a situation where the less strenuous form will be the best choice.
Will I Have To Learn All Three Forms?
You might be thinking… "Will I have to learn all three forms"?
Absolutely not.
If you only learn the first form it's perfectly fine. In fact I encourage you to learn the first form and use it for awhile before moving on unless you've already been playing bar chords.
First I'll go to the three forms and explain how to play them as well as what the advantages and disadvantages are of each form. Then I'll go through a system for practicing that will supercharge your progress tremendously.
Did I Mention "Practice"?
Yes, practice is critical… But don't stress.
The main reason people don't practice is they don't know what to practice and in what order. Were going to solve that here so you'll know exactly what to practice.
And it won't take a lifetime. If you can put in 5 to 10 minutes a day on the specific exercises I'll give you, you'll not only master the chords but you'll have a whole new outlook on what's possible for your guitar playing.
So let's get started with the easiest and extremely useful form of B…
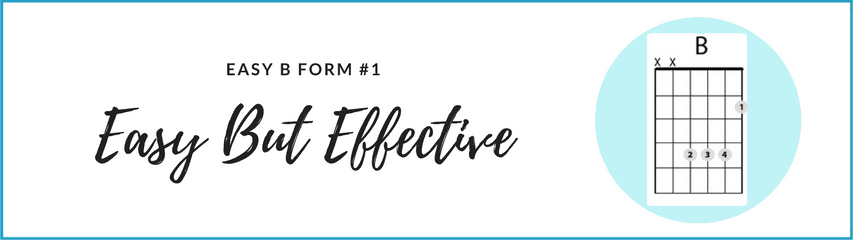
Form #1: Four Strings, Four Fingers & Barless
Who Is It For?
If you are brand-new beginner I recommend you start with this first B chord. It's fairly easy on the fingers. It's not only the easiest but also really does sound good. The main reason it's the easiest is because you won't need to use any type of "bar" to form this version.
Advantages:
- No "bar" needed to play this chord.
- It also doesn't require any large stretches.
- When you practice it you'll also be preparing yourself for other chords in the future.
- It does sound good and will fit most places that you need a B major chord to play a song.
- It works particularly well when you don't want an overly full sound. This is common when playing with other musicians like a keyboard or bass player because they are already playing the bass notes.
Disadvantages:
- It's not as full sounding as the next two versions.
- It doesn't work well with strums that involve hitting the bass note.
- If you're not accustomed to using your pinky it might take a little work to get it to cooperate.
How to Do it:
- Put the first finger on the second fret of the first string (the high E).
- Stretch your second finger over to the fourth string, fourth fret.
- Place your third finger on the third string, fourth fret.
- Place your pinky on the second string, fourth fret (I usually have students place the second, third and pinky down altogether).
- Strum the top four strings to make sure all notes are sounding (skip the fifth and sixth strings).
- Take your fingers off, shake your hand, and try it again.
- You did it!
Summary:
This four finger version of the B chord is a great choice for a beginner to start off with. You'll likely want to learn a bar chord version in the future to have more options depending on the sound you want. Fortunately learning this version will prepare you to play a bar chord version.

Form #2: Adding Some Bottom End
Who Is It For?
This is a good version to learn once you're fairly comfortable with form #1. It also may be the first version you learn if you're already comfortable with bar chords. It works particularly well on a nylon string guitar.
Advantages:
- It has a fuller sound than Form #1.
- If you can already play Form #1 the only addition will be using a bar.
- Makes the bass notes available for strums that use it.
- Allows you to play many chords in addition to the B major by just moving it up and down the fretboard.
Disadvantages:
- The bar chord can be difficult.
- It can be difficult to get all the fingers squeezed in on a guitar with a thin neck (i.e. electric).
- Since you're covering more strings there's more opportunity for muted and buzzing strings.
How to Do it:
- Start by fingering Form #1 of the B chord.
- Now, leaving your second, third, and fourth fingers were they are… Move your first finger across the second fret to form a bar across the top five (or six if it's easier) strings.
- Strum the top five strings to make sure all notes are sounding (don't worry about the sixth string right now).
- Take your fingers off, shake your hand, and try it again.
NOTE: If you're new to bar chords and you're finding it difficult I recommend doing the Bar Chord Exercise (included as part of this video) for at least several days before coming back to this version.
Summary:
Though this version does use the often dreaded "bar technique" it does have many uses, especially when you need a full sounding chord or are using a strum that includes the bass note. It also is a "movable" form… That means you actually will be learning many chords in the process.
It's highly recommended that you learn Form #1 first since it's a great stepping stone to playing this form.

Form #3: Only Two Fingers & Easy To Move
Who Is It For?
It's definitely the easiest to use on an electric guitar where the neck is thin and the strings are light. I also use this most of the time when playing acoustic guitar. Though it might seem difficult at first, once you learn the "partial bar" technique you'll likely find this version the quickest and easiest to use.
Advantages:
- Because it uses only two fingers it's quicker to make the chord.
- It's the easiest version to move up and down the neck to form different bar chords.
- It leaves the pinky free to do other interesting things.
Disadvantages:
- The "partial bar technique" can take a bit to get the hang of.
- It's more difficult on the guitar with a wide neck like a classical guitar.
How To Do It:
- Form a full bar across the second fret. You can either leave out the sixth string or form the bar all the way across… Either one will work fine.
- Now use your third finger to form a partial bar across the fourth, third, and second strings at the fourth fret (take a look at the chord diagram for Form #3).
- Check to make sure that the first knuckle on your third finger is collapsed and the second knuckle sticking up in the air.
- Your thumb should be behind the neck of the guitar with the ball your thumb resting on the neck.
- Strum all the strings to make sure all notes are sounding (don't worry about the sixth string right now).
- Take your fingers off, shake your hand, and try it again.
NOTE: Like Form #2 if you're finding the "bar technique" difficult I recommend doing the Bar Chord Exercise (included as part of this video).
Summary:
This version, often the exclusive version used by electric guitar players, is also my "go to" version for playing acoustic guitar. I find it the quickest version to get to when I'm moving around the guitar. At the same time the "partial bar technique" can take a while to learn and is something you may want to work at little by little over time.
How To Practice The B Chord (Any Form)
- Take a B chord finger position (form) that you want to work on. Start with just one.
- Slowly finger the chord, then take all your fingers off and start over.
- Do this a dozen times or more. If your hand begins to feel tense shake it out and relax.
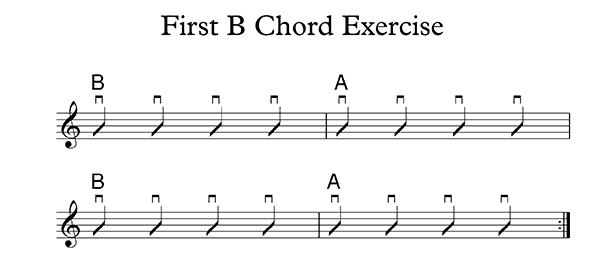
- Now practice playing the chord and moving to another chord. To start with I recommend playing the A major chord. Strum four times straight down (save more elaborate strums for later) on the B chord, and then strum four times on the A chord.
- Now try practicing while keeping a slow steady pulse. You can tap your foot, bob your head or just feel the pulse internally. Practice changing without slowing down or pausing.
- When you can do this fairly well try doing it with a metronome at a slow tempo.
- Finally, add a third chord and repeat the process. Little by little pick up the tempo and practice changing more quickly.
Where to Go From Here?
"Begin at the beginning," the King said, very gravely, "and go on till you come to the end: then stop."
Alice in Wonderland
Part of the key to learning any new chord on the guitar is to start small and keep building what you can do. I've seen many students jump to the most difficult form, get frustrated, and then stop trying altogether.
You're not one of those!
Start from where you're at. If that's the simplest form then so be it.
Work at it a little bit each day… Even just five minutes. First practice just fingering the chord, taking the fingers off, and putting them back on and hearing how it sounds. Do 20 repetitions, three times a day. Hey… That's only a total of about three minutes of practice. You still have two minutes left.
Then start practicing the exercise of changing from the B to the A chord. Go slow… But be persistent. First don't worry about the timing. Keep working with a good steady pulse. Slow… But persistent.
Now try doing it with a metronome. This will up the game a bit as you try to keep time.
Make the chord again. See how long you can go before you get off the groove. Stop when you get frustrated… And come back at it again later.
Then, when you're ready, try playing your budding B chord in a simple song. Start with just three chords. Again… Go slow and be persistent.
If you've been following my recommendations you should start feeling a sense of confidence with the first form of B chord that you started with. If you feel ready there's a couple ways to go (possibly both)…
1. Try the next chord in terms of difficulty. Go through the same process to work up being able to change between B and one other chord. Then try using it in a simple song.
2. You can also try using the simpler version of the chord in more complex songs. Work at changing faster. Use it in songs with more chords.
The important point is to keep finding ways to use it so that you continue to get quicker with the fingering and smoother at changing chords.
I'd love to hear how it's going for you. Let me know in the comments below about how you're progressing with this lesson and the B chord.

Life Saver
Feeling stuck? Frustrated by lack of progress?
In The Beginner's Journey course I'll take you step-by-step through a guitar learning adventure that's guaranteed to give you real results.
Best of all it's included at no extra charge with your Real Guitar Success membership. You can access Beginner's Journey here (log in first), or from your Home Dashboard.
Not a member yet? No problem! Sign up for the 14-day trial >> Real Guitar Success… and get started now.
Add To Pinterest

About the author
Tomas Michaud
Source: https://www.tomasmichaud.com/b-chord-guitar-finger-position/
0 Response to "Easy Ways to Play a B Chord"
Post a Comment